
Body
Oral performance
Porter characterizes the body/identity component of delivery as "concerning online representations of the body, gestures, voice, dress, and image, and questions of identity and performance and online representations of race, class, gender, sexual orientation, and ethnicity" (p. 208). Most pertinent to digital-audio response is the online representation of voice. Porter points out that "Voice and aurality are a central concern in digital rhetoric. . . . In digital spaces we have to consider not only textual presentation but oral performance, the very qualities of voice that were central to classical rhetoric" (p. 213).
Instructors vary in how they rehearse the oral performance of their response to students' texts. As my Computers and Composition article reports (Killoran, 2013), many instructors would record themselves reading their students' drafts aloud, adding impromptu comments as they went along; others read silently and planned their comments before recording them. The article also reports that instructors held mixed attitudes about their performances, especially as most inevitably recorded not only a stream of articulate, thoughtful comments but also some rather less articulate comments along with awkward silences and various background noises. Some appreciated the more personal tone and stance they could embody with their voice, whereas others felt self-conscious. Yet, no instructor reported receiving negative feedback from their students about their inarticulate performances.
Nevertheless, I'm definitely among the latter group. My responses are typically punctuated with hesitant uhh's and hmmm's, false starts, incoherent comments, and unplanned silences. Imagining my students sensitively attuned to the diplomacy, or lack thereof, in my response, I typically struggle to rehearse an authentic-sounding upbeat opening, especially in response to drafts about which there is little to be upbeat. Then, upon clicking the record button, I invariably falter, delete, and start again. One virtue of a robust audio editor like Audacity is the ease with which users can re-record false starts and edit out the most embarrassing evidence of their inarticulateness, a functionality I use liberally.
How to record and edit using Audacity
My Computers and Composition article (Killoran, 2013) recommends that instructors new to recording audio responses to their students' texts make the innovation "trialable" by experimenting with it. The article also acknowledges, however, that such a trial might be discouraged by the busy interfaces of Audacity and other audio recording and editing applications, which are equipped with far more functionality than would be needed for an impromptu monologue.
This page facilitates such a trial by focusing just on Audacity's basic functionality needed to record a digital audio response: how to —
- record your voice;
- pause and resume the recording; and
- edit the recording.
- Recording your voice
Upon opening Audacity, first-time users old enough to have used tape recorders or cassette players will immediately recognize the large familiar icons at the upper left of the window: play, record, and so forth (see Figure 1). Click the record button and speak into the microphone. Notice how the waveform scrolling horizontally across the center of the window displays the amplitude of your voice and the corresponding time measure. This will be handy in the third step, when seeking out a segment of the clip to edit.

Figure 1: Icons for pause, play, stop, skip to start, skip to end, and record. - Pausing, stopping, and resuming a recording
To pause the recording, click the pause button, and to resume recording, click it again. Alternatively, to stop recording, click the stop button. Whereas when resuming from a pause, the same waveform resumes from where the vertical cursor line left off, when resuming from a stop, a new waveform commences from wherever the cursor is positioned (it defaults to the beginning of the recording, not to the end), and appears below the previous waveform. Hence, when resuming from a stop, to avoid recording over a previously recorded clip, click at the end of the previous waveform so as to position the cursor such that the new clip will not overlap the previous clip.
From a casual listener's perspective, the differences between the pause and stop options are immaterial, but from the recorder's perspective, the distinct waveforms created by clicking stop can come in handy when editing, as passages that require significant editing, such as re-ordering, are easier to find if they appear as distinct clips.
- Editing a recording
Splicing a segment in or out of an audio clip is similar to inserting or deleting a passage from a document in a word processing application: both use such functions as cutting and pasting.
First, to locate a clip segment to be cut, click on the waveform to position the vertical cursor line at a point where play is to begin and then click on the play button to listen to the clip. Repeat until you have located the beginning and ending boundaries of a clip segment you want to cut. Then, using your mouse, select the clip in the same way you would select a passage of text in a word processing program. Using the Edit menu or using the editing icons (see Figure 2), select one of the options that are familiar from word processing programs, such as cut or delete. The clip segment will disappear and any portions of the clip before or after it will be spliced together.

Figure 2: Icons for cut, copy, and paste.To insert a previously cut or copied clip segment, click on the waveform to position the vertical cursor line at the desired insertion point. Using the editing menu or icons, select paste. The waveform will open up to accommodate the inserted clip. Note, however, that other waveforms above or below it will not shift, but these can be manually cut and pasted into other positions so as to avoid overlapping.
Improving audio quality
Finally, paralleling students' complaints about their instructors' illegible handwriting in written response are occasional student complaints about the poor audio quality of their instructors' digital-audio response. In a short anonymous survey I conducted during the first semester I experimented with this response method, I received a few such complaints, including one from a student who suggested that I "could use a more technologically advanced microphone so p's are not so pronounced, giving a deafened eardrum."
Instructors can frequently mitigate such problems by carefully positioning their microphone—even a cheap microphone—close enough to their mouth to clearly record their voice but also at an oblique angle from their mouth to protect their students' eardrums. Instructors can test the plosive effect of their p's (as well as other potentially problematic plosives such as t, and potentially problematic sibilant fricatives such as s) by examining the waveform of their recording.
For instance, the illustrations below (see Figure 3) show two waveform excerpts of my recording of the familiar "Peter Piper" tongue-twister, the first with the microphone positioned directly in front of my mouth, and the second with the microphone angled away from my mouth. As can be seen, the sharp spikes in the waveform of the first recording are smoothened in the second. The difference can also be heard by comparing the two accompanying audio recordings (play Recording 1).
![]()
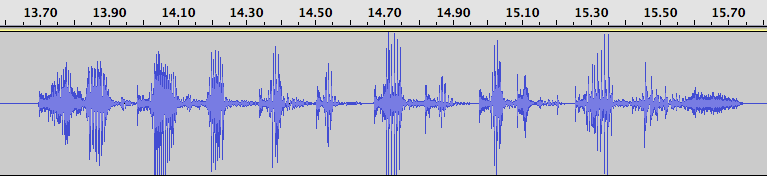
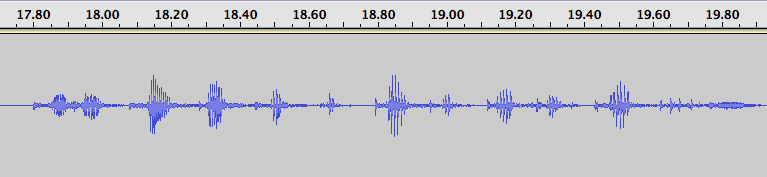
Figure 3: Two waveforms of the "Peter Piper" tongue-twister, the top one recorded with the microphone positioned directly in front of the mouth, and the bottom one with the microphone angled away from the mouth.
Recording 1: Two readings of the opening line of the "Peter Piper" tongue-twister, illustrated in Figure 3.