Recording and Uploading Audio
This section explains how I recorded and published the audio files for my online section of "Writing, Style, and Technology." I wouldn't want to claim that I am describing the only way to record and publish audio files--or even the best way. But this is the approach I took to recording audio, more or less. As I go through these instructions, I'll also provide more details on the nature of the audio files I recorded for the online version of "Writing, Style, and Technology."
Getting started: the necessary hardware and software
To record audio suitable for uploading to the Internet or that you could publish as a podcast, you really only need three things (besides server space): a computer, a microphone, and some software.
A Computer
I don't think I need to say much about this, although there are some minor differences between how this works with Windows-based PCs versus with OS X/Apple-based PCs.
A Microphone (or some other recording device)
Quite literally, you can spend less than $10 or more than $1000 for a microphone, depending on what you're using it for and your own audio file needs. Some newer Windows-based PCs and most Apple computers have a built-in microphone, though it's probably fair to say that even an inexpensive (say $25 or so) microphone will perform better than most of the built-in models. Then again, if you are recording just your voice in a quiet room and you are not particularly fussy about getting a "professional" sound quality, the built-in or inexpensive microphone will probably be fine.
 There
are lots of other ways to record audio suitable for posting on the Internet.
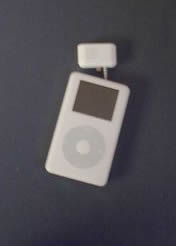
My initial audio recordings were made with my iPod and an attachable microphone
(pictured here), a good solution if portability is important. But ultimately,
I made most of my recordings with the help of the small microphone built into
my Apple iBook laptop, simply because recording the audio directly on to my
computer saved me a step from transferring the file from my iPod.
There
are lots of other ways to record audio suitable for posting on the Internet.
My initial audio recordings were made with my iPod and an attachable microphone
(pictured here), a good solution if portability is important. But ultimately,
I made most of my recordings with the help of the small microphone built into
my Apple iBook laptop, simply because recording the audio directly on to my
computer saved me a step from transferring the file from my iPod.
There are higher-end recorders and tools designed specifically for recording digital audio. This site at the University of Wisconsin does a good job of explaining some of the many considerations and options for recording audio. It's part of the handy Streaming Media at the University of Wisconsin web site.
Software
Once again, there are many different software packages for recording and manipulating audio, ranging from free to very expensive. Generally, in composition studies, there seems to be a consensus that the best free software option for creating basic audio files is Audacity. Here's why:
-
It's free.
-
It's relatively easy to use, with good support documents.
-
It's available in Unix format, for the PC and the Mac.
-
It can do a lot of things--see a full list of features here.
I recorded and then manipulated most of the audio recordings I made for my class using Audacity. However, as a Mac user, I have recently been exploring the many options of iLife '06, including GarageBand 3. While more complicated than Audacity, GarageBand offers considerably more features, including the ability to easily make graphically enhanced audio files and podcasts.
You also need software to listen to audio. If you have a Macintosh computer, the default software for listening to downloaded audio is iTunes. While Windows users can stick with the default media player, I recommend that those students use iTunes as well. It's free, available for Windows 2000 or XP (see http://www.apple.com/itunes/download/), and it is easy to use. Further, as I'll discuss in the "Podcasting" section, iTunes is very helpful for both publishing and listening to podcasts.
Thinking about the content to record
Perhaps this goes without saying, but before going too far into the process of recording, it's important to think about what sorts of audio files you actually want to record and why. There are of course many schools of thought on this, but based on my own experiences, here's what I think:
-
Write either a script or an outline for what you want to record. Since one of the reasons why I became interested in recording audio for online instruction was to avoid having to write a lot of text in the first place, I personally have not done any script-writing yet. However, at a minimum, it helps to have some good notes.
-
Practice. I have found the act of speaking "just to my computer" (instead of to a group of students in a traditional classroom, for example) to be an awkward experience. So, for all but the most brief of recordings, I have found running through my remarks a few times is helpful.
Since one of my goals for recording audio for "Writing, Style, and Technology" was to save time, I am afraid that I have learned these two particular lessons the hard way. Clearly, my original recordings could have benefited from some better planning and with some more practice. But while doing these things would have resulted in better quality audio files, it also brings into question the "time saving" value of recording audio files in the first place. -
Keep it brief. An audio recording meant to be heard by someone individually is not the same as a classroom lecture. For one thing, it is likely that your audience will not be giving you the same level of "undivided attention" as in a classroom setting. For another, the longer the audio file, the larger the file, and large files (audio and otherwise) can take time to download. Again, this is a lesson I learned more from mistakes than successes.
-
Learn a bit about your audio software and edit your files. At a minimum, you'll want to learn how to use whatever software you are using to do simple things like converting them into an MP3 format (see below). But if you go a step further and learn how to edit your sound files, even a free and relatively easy to use software like Audacity can achieve surprisingly professional-sounding effects. For example, Audacity, GarageBand, and other related software makes it easy to literally "cut and paste" parts of a sound recording, allowing you to eliminate coughs, repetitions, "ums" and "ahs," mistakes, etc.
Making Audio Files Available on the Web
This part of the process is surprisingly easy. The short version:
-
Record the audio file.
-
Upload the audio file.
-
Link to the audio file the same way that you would link to any other file.
That's it.
Here are a few more details:
Record the audio file
Because the process of recording audio into a particular software program is dependent on which program you're using, I won't elaborate on specific instructions here. Readers will be able to find help files and instruction sets on the web by searching for specific tutorials related to the software programs I've already mentioned. Instead, I want to discuss compressing the files for distribution, which needs to be done after recording the files but before uploading them.
Audio exists in a variety of formats,
but I have found that mp3 is still the best format for basic
audio files that can be heard by users with less than 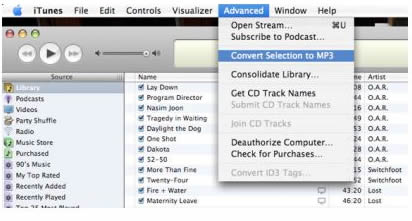 sophisticated
computers. You can't include graphics with mp3 files as you can with the format
of choice for enhanced podcasts, which is the mp4 format; also, mp3 files are not as
compressed as mp4 files. On the other hand, mp3 files are relatively small
(compared to wav files, for example), and they can be played on most modern
computers.
sophisticated
computers. You can't include graphics with mp3 files as you can with the format
of choice for enhanced podcasts, which is the mp4 format; also, mp3 files are not as
compressed as mp4 files. On the other hand, mp3 files are relatively small
(compared to wav files, for example), and they can be played on most modern
computers.
There are a variety of ways to compress audio files into the mp3 format. When I used Audacity to record audio, I could export directly to an mp3 file with the mp3 plug-in that comes with Audacity. I also found another way to convert non-mp3 files was to open iTunes, select the audio file, and then select"Convert selection to MP3" under the "Advanced" menu. This image is from a Macintosh computer, but of course, iTunes is available for Windows as well and looks similar.
Upload the file
Sound files are like other kinds of files you can upload to a server and then access--either directly or through a link. So, for example, when you link to an HTML page, your browser will open another web page. When you link to a JPEG, your browser will show the graphic in the main viewing window. When you link to a .doc file, usually your browser will launch a word processing application to view the file. And when you link to an mp3 file, your browser will either open it directly and play it, or, in the case of some older browsers, it will save the sound file to your computer so it can be played later on.
How and where you upload the file so it can be downloaded by a user depends a lot on your server configuration and your goals in getting the audio file to users in the first place. If you are uploading the file to a web server, you should be able to upload the file the same way you would upload an HTML file, or graphic, or PDF, etc. However, your server space may have limitations that prevent you from transferring large files (and remember: typically, an audio file is about 1 MB per minute). At EMU, the space limit on the available server for publishing web sites is 20MB--enough for an elaborate text and graphic-rich web site, but not enough to support a site that includes multiple audio or video files.
The approach I took with uploading the audio files for my online section of "Writing, Style, and Technology" was to upload them into the course management system I was using, eCollege. I did this because eCollege is the home to most of my other instructional materials and also because the eCollege site and software supported these large files.
Link to the file
Here's an example of the code from the eCollege site of what I mean by a link:
<a href="/ec/courses/18586/CRS-ENGL328-2381813/mp3_files/Williams1.mp3" target="new"> My audio comments on Getting Started and Chapter 1: Causes</a>
If you know anything about HTML, you'll probably recognize the <a href= and </a> because that's simply the tags for a link to another document. All the gobbledygook before "mp3_files" in the URL is created by the eCollege course management software where I uploaded the file. Finally, you'll notice that the URL for the link information ends Williams1.mp3, which is the name of the mp3 file.
A More Specific Example
One of the books I teach in "Writing, Style, and Technology" is Joseph Williams' Style: Toward Clarity and Grace, one of the most thoughtful, thorough, and insightful commentaries on good writing style. (It’s a great book for an advanced writing class, especially in relation to another book we read, the Strunk and White classic The Elements of Style.) Williams’ book is a complicated one, and it is challenging for many students to absorb. To help, I included on the eCollege web site some written notes and audio commentary on each chapter.
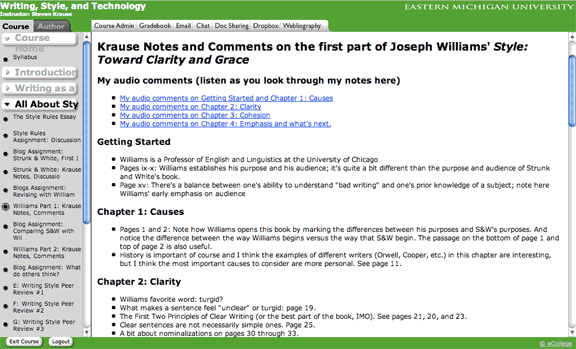 Here
is a screen image from the eCollege "shell" for my section of "Writing,
Style, and Technology." eCollege,
like WebCT, Blackboard, and other products, is produced and managed by a for-profit
company, and it is the default course management system for Continuing Education
at EMU.
Here
is a screen image from the eCollege "shell" for my section of "Writing,
Style, and Technology." eCollege,
like WebCT, Blackboard, and other products, is produced and managed by a for-profit
company, and it is the default course management system for Continuing Education
at EMU.
Under the headline "My audio comments" are links to the audio files themselves. As you can see here, I have links to the audio, and then my notes, which scroll down quite a bit.
Here is one of the audio files from this unit. This file is 6.2 MB and 8:30 minutes long, typical of the audio files I included in the course. Also, I recently cut a fair amount of unnecessary recording from this file with GarageBand--it was originally closer to 10:30 minutes. When students click on the link on the eCollege course page, an mp3 file like this one downloads to their computer.
For the Williams book, I had about thirty minutes of audio commentary on the eCollege site. Altogether, including my comments on Williams and on other material and projects in the class, I had about fourteen audio files averaging 10 minutes each.
Other audio recording tutorials
As I said at the beginning of this section, I cannot claim that the way I recorded and posted audio files on my class course management site was the only or even the best way of doing this. Here are a few helpful links to tutorials that show you different ways of accomplishing these tasks:
-
"Recording Audio and Podcasting Demonstration" at Indiana University in South Bend.
-
Audacity Home Page, which includes links to information on how to use this great program.